Layout, shortcuts, auto-save, and workflow tips.
Interface Guide
Layout
The Studio has two layout layers that matter:
- App shell — a left navigation sidebar for switching sections like Zones, World, Items, and Settings
- Zone editor workspace — the default screen, with a top menu bar (File · Edit · View · Game · Tools · Help), a left map browser, a center canvas, a right context panel, and a bottom status bar
- Pages and modals — content editors open as dedicated pages from the app nav, while tools like Database, Plugins, Build, and Settings open from the editor menu bar
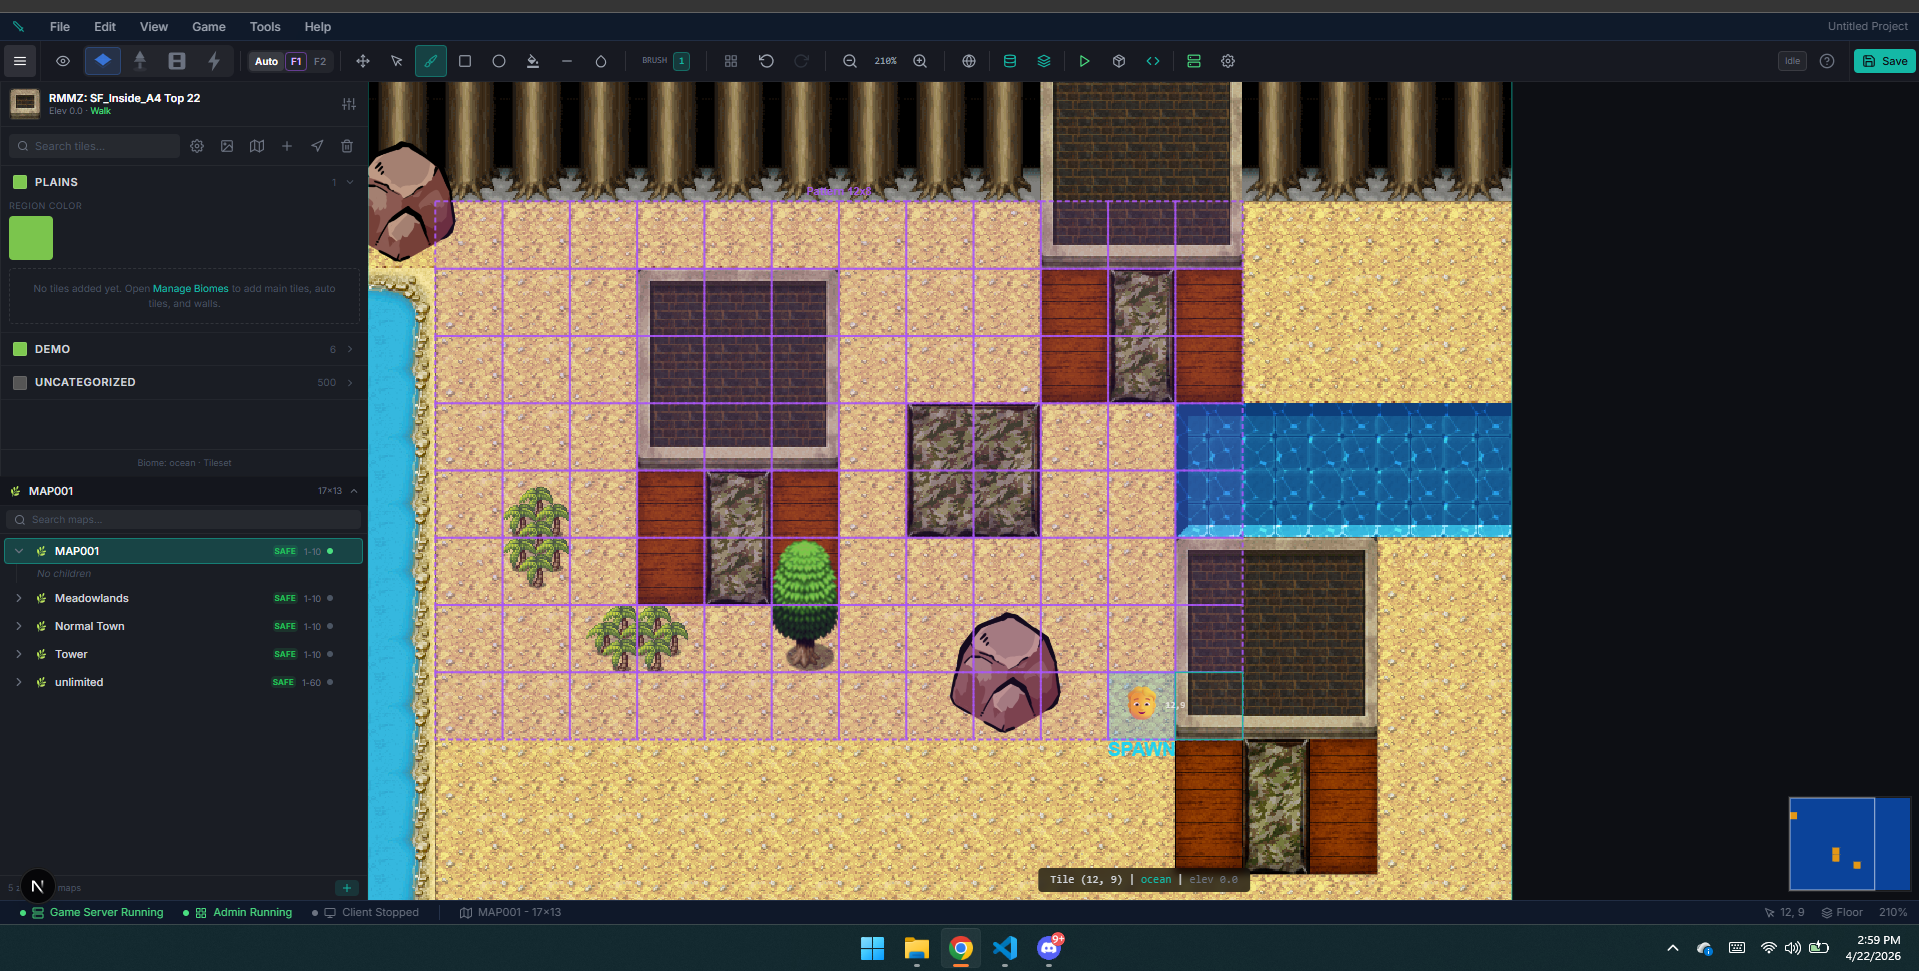
Keyboard Shortcuts
Press ? (Shift + /) at any time inside the zone editor to open the in-editor shortcut overlay. It lists the live set of bindings for the current mode.
Map Edit Mode — Tools
| Key | Action |
|---|---|
| H | Hand tool (pan the view) |
| P | Pencil tool (paint tiles) |
| R | Rectangle tool |
| C | Circle tool |
| F | Flood fill tool |
| E | Eraser tool |
| I | Eye dropper (sample tile from map) |
| S | Select tool |
| G | Toggle grid |
| [ / ] | Decrease / increase brush size |
Event Mode — Tools
| Key | Action |
|---|---|
| S | Select event |
| E | Erase event |
| G | Toggle grid |
| Double-click | Create a new event (empty tile) or open the event editor (existing event) |
Editing & Clipboard
| Key | Action |
|---|---|
| Ctrl+S | Save current work |
| Ctrl+Z | Undo |
| Ctrl+Y | Redo |
| Ctrl+C | Copy the active selection (tile stack or event) |
| Ctrl+V | Paste the clipboard at the cursor |
| Delete | Delete the current selection |
| Escape | Clear selection, cancel marquee, or close a modal |
There is deliberately no select-all shortcut: drag with the Select tool (S) to choose a region. Ctrl+A used to wash the entire map in the purple selection tint, which is one stray Delete away from erasing everything.
View & Navigation
| Key | Action |
|---|---|
| Space + drag | Pan the view |
| Middle-click + drag / two-finger swipe | Pan |
| Scroll wheel / trackpad pinch | Zoom |
| + / − | Zoom in / out |
| 0 | Reset zoom to 100% |
| Home | Center the view on the map |
Player Controls & Loadouts
The included game client supports multiple control styles instead of forcing a single MMO layout.
Control Presets
Projects can ship with presets for:
- Point-and-click — classic click-to-move MMO controls
- Hybrid — click movement plus direct-combat hotkeys
- WASD — direct movement with action bindings
- Keyboard-only — no mouse requirement for core movement/actions
- Controller — gamepad-aware movement and camera rotation support
- Touch — tap-to-move and virtual joystick options for mobile play
Binding Coverage
The runtime control config can bind actions across these categories:
- Movement — click move, directional movement, run modifier
- Camera — rotate left/right, face cursor
- Combat — primary attack, auto-attack, Stop (default Z — cancels auto-attack, the walk into range, and any cast in progress), equipment-derived abilities, and hotbar slots
- Interaction — interact and contextual world actions
- Panels — inventory, character, skills, abilities, quests, market, pets, breeding, build, world map, and store
- Social / System — guild, friends, close, keybind reference, and admin actions
Aiming & casting
How a press turns into a cast. Three modes, because each is wrong for some ability:
| Mode | What pressing an ability does |
|---|---|
| Instant (quick cast) | Fires immediately at the cursor. Fastest, but you can't see where a skill shot will land before spending it |
| Hold to aim, release to fire | Press shows the ground indicator; release fires. The default. A quick tap behaves exactly like Instant, so nothing gets slower — holding is what buys you the preview |
| Press to aim, click to fire | The indicator stays up; left-click fires, right-click or Escape cancels. The safe mode: nothing is spent until you commit |
Abilities that must be aimed — skill shots, and anything that drops an area on the ground — always show their indicator regardless, because the only other way to learn where one lands is to spend it and watch. Targeted spells already know where they're going, so they keep tab-target's snap. Aim targeted abilities turns the preview on for those too.
Aiming on a phone
On a touch screen there's no cursor to aim with, so an ability button aims by drag:
1. Press and hold an ability button — the ground indicator appears. 2. Drag your thumb in the direction you want it. The indicator swings from your character, so you steer it without your finger ever needing to be on the target. 3. Release to fire.
A quick tap still just casts, so nothing slows down. Abilities that charge wind up while you hold and release at whatever strength they reached, exactly as on desktop.
> The drag is a direction, not a place. Your thumb sits on a button in the corner of the screen — if the game aimed where your finger actually was, every skill shot would land on your own hotbar. So the game reads which way you dragged and how far, and aims out from your character. A small drag aims close; a longer one reaches further, up to the ability's range.
A tiny drag does nothing at all (that's the deadzone — a tap is never perfectly still, and without it the smallest tremor would swing your aim). Dragging right off the button keeps working, so you can pull well past its edge to aim.
Which buttons aim this way: the on-screen touch buttons and the equipment ability slots. On phones the touch buttons normally are the hotbar — see the Phone layout page.
The action bar on a phone
On a phone, pressing a slot is using it — so by default, reading it and changing it sit on gestures that never use it:
| Gesture | What it does by default |
|---|---|
| Tap | Uses the slot — casts the ability or uses the item, exactly like pressing its key |
| Hold (and drag) | Aims or charges the ability, then fires on release (see Aiming on a phone above) |
| Double tap | Shows the slot's details (its tooltip). They stay up until your next touch anywhere |
| Double tap and hold | Opens the picker to change what's in the slot (numbered hotbar slots) |
| Tap an empty slot | Opens the picker straight away — there's nothing to use yet. This one can't be reassigned |
You can reassign all four — see Changing the action bar gestures below.
- The first tap of a double tap still counts as a tap. If it armed a skill shot (Click mode, the touch default), the double tap puts it away again, so reading or changing a slot never leaves a spell waiting to fire on your next touch. If it cast something or used an item (Hold or Instant mode, an ability that needs no aiming, a potion), that has happened.
- Holding a slot never shows its details unless you put Show its details on Hold. By default a hold is aiming or charging, not a question.
- The equipment slots can't be changed from the bar — they follow what you have equipped — so whichever gesture changes a slot does nothing on them.
- With a mouse nothing changes — hover shows the tooltip, and clicking a numbered slot opens its picker. The gestures only apply to the phone layout.
Changing the action bar gestures
Where: World → Player Controls → Touch → Action bar gestures sets your world's default. Players can pick their own in the game under Settings → Controls → Action bar on a touch screen (shown on phones only), as long as Allow player-side overrides is on (World → Player Controls → Movement).
1. Open World → Player Controls and switch to the Touch tab. Touch controls must be enabled for the gestures to be editable. 2. Under Action bar gestures, pick what each of the four gestures does. 3. Save the world. Players get the new default on their next visit. A player who picked their own gestures keeps them until they choose Use this world's or reset their controls.
Each gesture can be set to one of:
| Action | What it does |
|---|---|
| Use it | Casts the ability or uses the item, like pressing the slot's key. On Hold or Double tap and hold it reads aim or charge while held: the key stays down while the finger does, and lifting fires |
| Show its details | Opens the slot's tooltip |
| Change what's in it | Opens the picker (numbered hotbar slots only) |
| Nothing | The gesture does nothing on a slot |
How the timing works:
- When Tap and Hold both use the slot (the default), the slot's key goes down the instant a finger lands, just like a key press, so a tap casts with no delay and holding simply keeps it down to aim. The same goes for Double tap and Double tap and hold together.
- Otherwise a tap acts when the finger lifts and a hold after about half a second, so the game can tell them apart. Say you put Change what's in it on Hold: a tap still casts (on the lift), holding opens the picker instead of casting, and in Click mode a tap still arms a skill shot for a second tap to fire. What you lose is aiming by holding the slot.
- A tap that uses the slot never waits to see whether a double tap follows, because that delay would be on every cast. A tap that only shows details or changes the slot does wait a moment, so a double tap can replace it.
- Leave both double-tap gestures on Nothing and quick taps are all casts. Spamming a slot then never turns into a double tap.
- Show its details and Change what's in it can each sit on only one gesture. Picking one that is already taken moves it, and the gesture that had it is left doing Nothing, the same way a rebound key moves.
- Something must use the slot. The last gesture set to Use it can't be changed; the editor greys out the other choices. A stored map that uses nothing (edited by hand, say) is reset to the default when it loads.
- With no gesture set to Change what's in it, a player on a phone can only fill an empty slot. The editor warns you.
- Turning off Allow player-side overrides applies your gestures to everyone at once. Players' own choices are kept, not deleted, so turning it back on restores them.
Hotbar & Loadouts
- The action bar includes equipment-driven combat slots plus 4 player-configurable hotbar slots
- Abilities and supported consumables can be assigned to those hotbar slots
- Named loadouts can be saved and switched to restore hotbar setups quickly
- Loadout switching is persisted through the game server, so it is part of the runtime, not just a local mockup
Auto-Save
The map editor supports configurable auto-save intervals:
- Off
- Every 5 minutes
- Every 10 minutes
- Every 15 minutes
Staying Connected (Studio Web)
In the browser, opening a project from your account dashboard connects that tab to the project for 24 hours of inactivity. The clock resets every time you do something — saving, switching zones, opening a Database section — so a long editing session never gets interrupted. Leave the tab alone for a full day and the connection lapses; you land back on the dashboard, and clicking the project reconnects you.
Signing in is separate and much longer-lived, so a lapsed project connection is a single click to fix, not a fresh login.
Grid Display
- Toggle grid visibility in the map editor toolbar
- Grid snaps to tile boundaries for precise placement
- Adjustable grid scale for different zoom levels
Undo/Redo
The map editor maintains a full undo/redo stack for:
- Terrain painting
- Object placement
- Object deletion
- Layer changes
Play Testing
Launch Game → Playtest (Ctrl+P) from the menu bar to instantly open a game client connected to the embedded server.
On the desktop app, Playtest signs you straight into the world — no login screen, no character select. Each project gets its own dedicated Playtester account: your first launch creates its character, and every later launch resumes it, so your playtest inventory and progress persist between sessions. Turning this on also enables the embedded server's local email/password accounts, so your game's login screen gains a sign-in form alongside guest play — useful when you want to test with a second, separate account. If a Playtest ever drops you on the login screen instead of in the world, restart the game server from the Server tools and launch again.
Every Playtest launch publishes your authored content to the embedded server first, then opens the client. On the desktop app the editor and the game server keep separate copies of your project database, so this step is what guarantees the character templates, items, mobs and maps you just saved are the ones you play against. Large projects take a few extra seconds on launch while that runs; if it can't finish, the client still opens and the editor warns you that you may be playing slightly stale content.
Some changes (like new plugins) additionally require a server restart, which you can do from the Server tools.
Playtesting is also where you can verify player-facing systems that are easy to miss from the editor alone, such as:
- active control preset behavior
- keybind reference display
- hotbar assignment and named loadouts
- touch controls and mobile-oriented overlays when enabled
Content Lists
All content editors (Items, Mobs, NPCs, Quests, etc.) share a common pattern: 1. A searchable list showing all records 2. Click any record to open its edit form 3. A Create button to add new records 4. Delete with confirmation
Most editors also feature tabbed forms to organize settings. For example, the Item editor has tabs for Stats, Combat, and Crafting configuration.