Create weapons, armor, tools, materials, and consumables.
Items & Equipment
The Items editor lets you create every type of item in your game. Items are used by the inventory, equipment, crafting, market, loot, and shop systems.
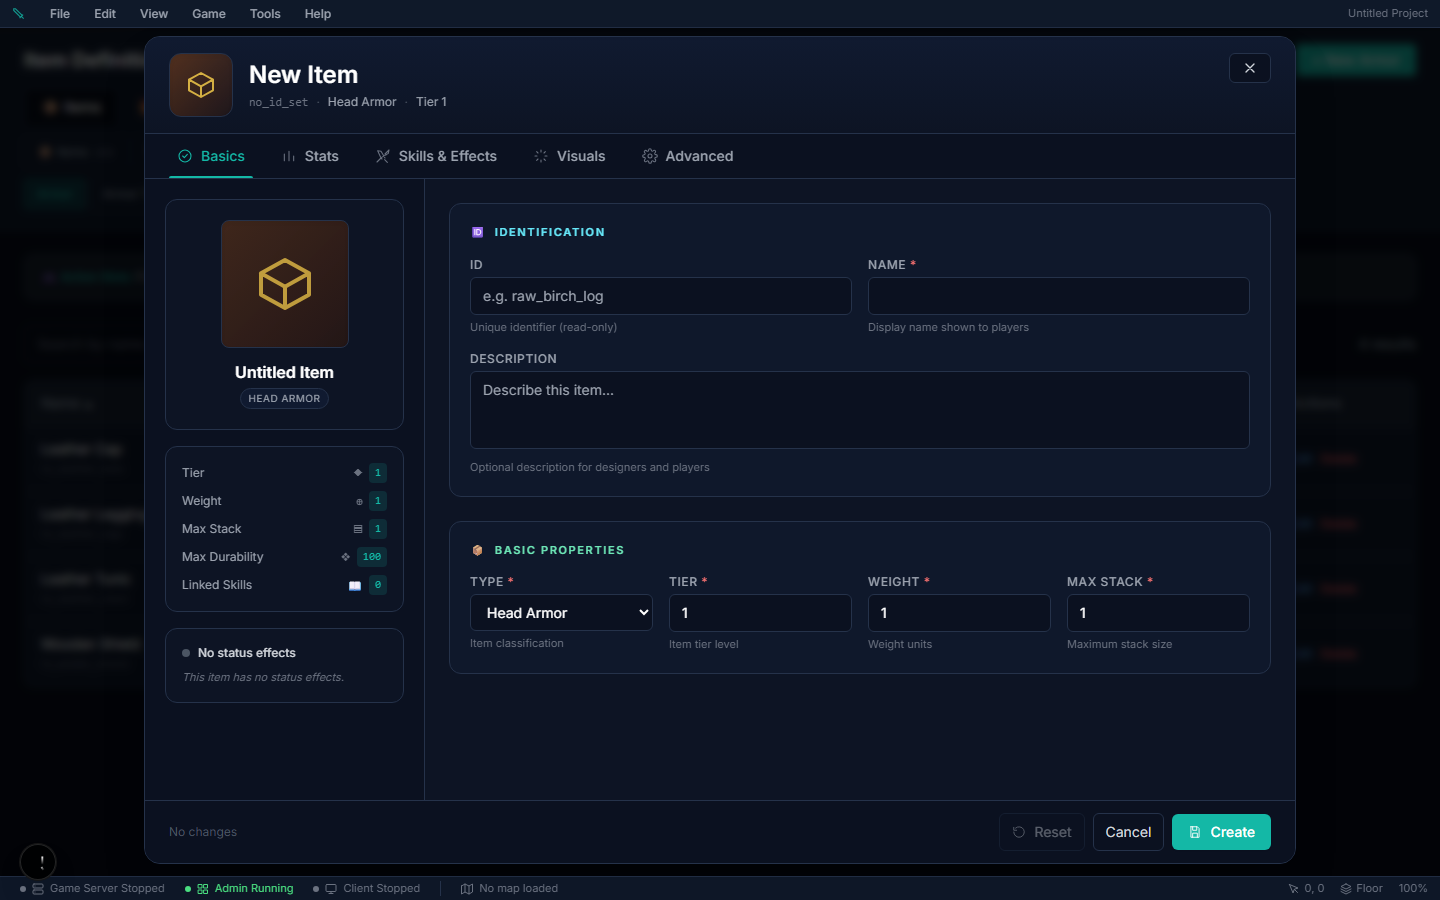
Item Types
Weapons
Melee — Sword, Axe, Mace, Dagger, Spear, Katana, Bat. Ranged/magic — Bow, Crossbow, Staff. Firearms — Pistol, Revolver, SMG, Rifle, Shotgun, Sniper Rifle, Assault Rifle, LMG, Rocket Launcher.Armor
Head, Chest, Legs, Boots, Cape, Shield, plus Accessory (rings/necklaces).Tools (8 types)
Axe (harvesting), Pickaxe, Sickle, Skinning Knife, Fishing Rod, Hammer, Hoe, Watering CanOther Categories
- Consumables — potions, food, scrolls, and single-use items
- Materials — raw resources, processed resources, and components
- Housing — furniture, decorations, and plot upgrades
- Pet & Mount — eggs, pet food, taming items, mount gear
- Farming — seeds and farming tools
Filtering the item list
Database → Items shows one category at a time (Items, Skill Books, Weapons, Armor, Tools, Building, Chests). Inside a category, narrow the list with the two controls above the table:
| Control | What it does |
|---|---|
| Search | Matches item name or ID as you type |
| Type filter | A dropdown of every type in the category — tick as many as you like |
The type dropdown is a multi-select:
1. Click the filter box (it reads All types when nothing is picked). 2. Type in the search box at the top of the panel to narrow a long type list. 3. Tick each type you want. The panel stays open so you can tick several — for example Food + Potion / Poison to review every consumable at once. 4. The number beside each type is how many items of that type exist in the category, so empty types are obvious before you pick them. 5. Select all ticks everything currently listed (everything matching your panel search, if you typed one); Clear or Clear filters resets it.
The box summarises what's active — one or two picks by name, more as "Food +2 more" with a count badge.
Gotchas
- An empty filter means no filter — every type in the category shows. There's no "All" checkbox to tick.
- Ticking Rune on its own opens the purpose-built Runes editor instead of the item table; same for Upgrade Material. Tick a second type (or clear the filter) to go back to the normal table.
- Runes and upgrade materials authored before those types existed are stored as Component with a rune/upgrade config. They're counted and listed under both, which is why the totals can look larger than the raw type counts.
Item Tiers
Tier is decided by where an item enters the world, not by the item. You give each item a tier band (Min–Max) that says which tiers it may appear at, and each map a Tier. A drop then rolls a tier at or below the map’s tier. See Zone Tiers for the full system.
Two copies of the same sword can be T3 and T5, and an item never changes tier once it exists — which is why higher-tier gear only comes from higher-tier maps. Base Stats you author are the stats at the band’s Min Tier, and each tier above scales them up.
Items come in 8 tiers (T1–T8) that scale their stats. The scaling is linear with a configurable step — multiplier = 1.0 + (tier − 1) × step. The default step is 0.25, giving:
| Tier | Multiplier (at default step) | Description |
|---|---|---|
| T1 | 1.0× | Starter / basic |
| T2 | 1.25× | Common |
| T3 | 1.5× | Improved |
| T4 | 1.75× | Crafted |
| T5 | 2.0× | Rare |
| T6 | 2.25× | Epic |
| T7 | 2.5× | Legendary |
| T8 | 2.75× | Mythic |
The per-tier step (weaponTierScaling) is a tunable combat constant, so the whole curve above is just the default — flatten it for a low-power game or steepen it for a big endgame gap without touching any item. See Tuning Constants.
Item Quality (authorable)
Crafted items roll a quality bucket that further boosts stats. The buckets are creator-defined — managed in the Rarity & Quality editor (in the app sidebar), where you rename, recolor, and reorder them. The engine seeds a default ladder you can keep or replace entirely:
| Quality (default ladder) | Stat Multiplier |
|---|---|
| Normal | 1.0× |
| Good | 1.1× |
| Outstanding | 1.2× |
| Excellent | 1.35× |
| Masterpiece | 1.5× |
Higher crafting skill and better crafting stations increase the chance of rolling higher quality.
Item Rarity (authorable)
Separate from craft quality, rarity is set on the item definition — it drives the item's name/label color, glow, and drop presentation — and a copy that drops can roll a different one (see Rolled Rarity below). Rarity tiers are fully creator-defined in the same Rarity & Quality editor:
| Field | What it does |
|---|---|
| Name & order | The tier's label and its power rank (low = most common) |
| Color / glow | Text and border/glow colors used wherever the item shows |
| Drop weight | How often this rarity comes up when a dropped copy rolls one (and in loot tuning) |
| Beam | Whether dropped items shoot a ground light-beam (great for flagging rare loot) |
| Stat multiplier | How strong a copy that rolled this rarity is, relative to the item's own rarity |
Add as many rarity tiers as your game needs — from a simple Common/Rare split to a full Common → Mythic ladder.
Rolled Rarity (drops that come out rarer)
A copy of an item can drop at a different rarity from the one on its definition — kill a bandit and the Iron Sword it drops may come out Exotic, stronger and in the Exotic color. You don't need a separate "Exotic Iron Sword" item for every tier.
Where to author it:
| What | Where |
|---|---|
| How often each rarity comes up | Rarity & Quality → each rarity's Drop weight |
| How much stronger each rarity is | Rarity & Quality → each rarity's Stat multiplier |
| Whether gear rolls at all, world-wide | Rarity & Quality → Gear rarity roll chance (also under Combat → Tuning) |
| One item's own odds | Items → (an item) → Stats → Rarity roll |
Setting it up:
1. Open Rarity & Quality and give each rarity a Drop weight (Normal 10, Rare 5, Exotic 2.5 …) and a Stat multiplier (Normal 1, Rare 1.5, Exotic 2 …). 2. Set Gear rarity roll chance to how often a gear drop should roll a rarity — 100% means every drop rolls, 0% turns rolling off. Save. 3. Optionally open an item → Stats → Rarity roll to give it its own odds.
Item fields (Rarity roll):
| Setting | What it does |
|---|---|
| World default | Equippable gear that doesn't stack rolls at the world's gear rarity roll chance; anything else never rolls |
| Custom | This item rolls at its own Chance a drop rolls at all, from the rarities you tick (none ticked = all), with optional per-rarity Weight overrides — an empty weight uses the rarity's own drop weight, 0 stops that rarity rolling on this item |
| Off | Every copy keeps the item's own rarity |
The editor shows the resulting chance of each rarity and the stat scale it gives, computed by the same roller the server uses.
- The stats you author are the item at its own rarity. A copy scales by rolled multiplier ÷ own multiplier: a Normal sword (×1) that rolls Mythic (×3) gets triple stats, and one that rolls Normal is unchanged. A copy can even roll below its own rarity and come out weaker.
- Only new loot rolls. Mob and NPC drops, dungeon loot and chest contents roll; shop purchases, crafted items and quest rewards always come as the item's own rarity. An item a player drops on death keeps the rarity it had.
- A rolled copy is its own item. It never stacks with a copy of a different rarity, and it keeps its rarity through trades, mail, the market, the bank and shop buyback.
- Affixes follow the rolled rarity — an affix restricted to Rare-and-up can roll on a copy that came out Rare.
- Rolling runs on the game server, so a live world picks up new odds when you Publish.
Elements (authorable)
Weapons and abilities can carry an element that feeds an effectiveness matrix (e.g. water beats fire). Elements and their matchup rates are creator-defined in the Elements editor — they're not a fixed list, so you can build whatever affinity system your game needs.
An element applies to a hit from whichever source carries it: the ability's element, or — for a basic weapon attack — the equipped weapon's. Either way the same element drives all three outcomes: the effectiveness multiplier, any status procs bound to that element, and the damage number, which is tinted with the element's authored color and tagged WEAK / RESIST / IMMUNE / ABSORB.
Equipment Slots
Characters have 11 equipment slots:
| Slot | Accepts |
|---|---|
| Head | Helmets, hats, hoods |
| Chest | Body armor, robes |
| Legs | Leg armor — greaves, pads, trousers |
| Boots | Footwear |
| Main Hand | Weapons (1-hand or 2-hand) |
| Off Hand | Shields, secondary weapons |
| Tool | Gathering tools (pickaxe, axe, rod, etc.) |
| Cape | Capes and cloaks |
| Accessory | Rings, necklaces |
| Pet | Active pet companion |
| Mount | Active mount |
An item's Type picks its slot automatically: Armor Head → Head, Armor Chest → Chest, Armor Legs → Legs, Armor Boots → Boots. Legs and Boots are separate slots, so a character wears leg armor and footwear at once.
Handedness — which pose a weapon is held in
On a weapon's Combat tab, Handedness has three settings:
| Setting | What it does |
|---|---|
| Inherit from weapon type | Uses the grip set on the weapon type. The default |
| One-handed | Leaves the off hand free, and the character holds the 1-handed pose |
| Two-handed | Occupies both hands — equipping it moves any off-hand item to the bag — and the character holds the 2-handed pose |
Set this per item, not per weapon type: a hand axe and a greataxe are both axes, and a rapier and a greatsword are both swords. Without it, every axe in the world would stand and swing two-handed while every sword stayed one-handed.
Handedness only retunes the melee 1H/2H pair. Bows, firearms, staves and polearms keep their own stances — those weapons already have a real grip built into their animations, so marking one "two-handed" changes what it blocks in the off hand but not how it is held.
Use & Equip Requirements
Any item can gate itself behind what a character has earned. Open the item and find the Use & Equip Requirements section (the 🔒 panel). Blank means no requirement.
| Field | What it does |
|---|---|
| Required Level | Minimum character level. Blank or 0 = none |
| Required Skill | A skill from your world the character must have trained. Pick from the dropdown — it lists the skills you've authored |
| Required Skill Level | Minimum level in that skill. Defaults to 1, and is disabled until you pick a skill |
| Stat minimums | Optional floors on computed stats (Attack, Max HP, …), under the collapsed Stat minimums row |
Requirements are checked on the server for both equipping gear and using/consuming an item (potions, food, scrolls). The player gets the first unmet requirement back as a message that names the skill and the level they currently have — "Requires Axe Skill level 2. You have 1."
Gotchas
- A requirement pointing at a deleted skill is ignored, not enforced. If you delete or rename a skill after gating an item on it, no player could ever satisfy that gate, so the engine drops it rather than making the item permanently unequippable. The server logs a warning naming the item and the missing skill.
- The editor shows such a stale gate as ⚠ Missing skill: <id> in the Required Skill dropdown. Repoint it at a real skill or set it back to — None — to clear it.
- Skill ids are matched loosely on case, so an item authored against
AXEstill resolves to a skill calledaxe. Two skills whose ids differ only by case are ambiguous and won't resolve — give them distinct ids. - Requirements are a gate, not a hint: the player only learns about them when they try. Say so in the item's description if it matters.
Creating a Weapon
When creating a weapon in the editor, you configure:
- Name, description, icon — what the player sees
- Type — sword, bow, staff, etc.
- Tier — T1 through T8
- Damage type — Physical, Magic, or True (ignores defense)
- Base damage — flat damage value
- Scaling stat — which character stat multiplies damage (Attack, Magic Power, etc.)
- Scaling ratio — how much of the stat applies (e.g., 0.5 = 50%)
- Grip — 1-handed, 2-handed, or dual-wield
- Stat bonuses — additional stats when equipped
Weapon Types & the Unarmed default
Weapons are linked to a weapon type (managed under Items → Weapon Types) that defines how the weapon behaves and animates, separate from the weapon item's own stats. Each weapon type carries:
- Animation category — which attack animation plays (slash, thrust, crush, bow, sidearm, rifle, cast, or unarmed)
- Normal attack ability — the basic left-click attack
- Q / W abilities — the two weapon-bound abilities on the action bar
- Base attack speed, range, grip, and damage type
Unarmed (the default fighting style)
There is a built-in Unarmed weapon type that can't be deleted — only edited. It's the empty-handed default: when a character has no weapon equipped, the Unarmed type drives their basic attack (left-click), Q/W abilities, and attack animation, exactly like an equipped weapon. Set the fists animation and a punch ability on it under Items → Weapon Types → Unarmed. (Leave its normal attack blank and players fall back to a built-in punch, so they always have a basic attack.)
Creating Armor
- Weight class — Light, Medium, or Heavy
- Base defense / magic resist — flat damage reduction
- Stat bonuses — additional stats when equipped
Equipped Appearance (Visuals tab)
Weapons and armor show on the character exactly like characters, mobs, and NPCs do — through a saved sprite asset. On the item's Visuals tab, the Equipped Sprite Asset field shows a live preview of the current sprite and opens a visual gallery instead of a name list:
| Choice | What happens in-game |
|---|---|
| A sprite asset | That sheet is drawn as an overlay on the character, following the body's current animation and direction |
| Use item sprite fallback (blank) | The engine falls back to the item's icon sprite |
| None — hidden | Nothing is drawn on the character (stat-only gear) |
The Avatar & Sprite Editor sits right under that field, in the item form — the same editor the character, mob, pet and mount editors use. Import a sheet, set the frame grid, add animations, map directions, set scale and recolor, all without leaving the item. Its Load saved sprite… control does the same thing as Choose above: the item now uses that saved sheet, and the editor edits it in place.
Sheet edits are written when you press the item's Save Changes, so one save covers both the item and its sheet; the Save sheet button next to the sheet name writes it immediately if you'd rather. An Unsaved marker appears while the sheet has pending edits. Editing a sprite asset changes it everywhere it's used, so duplicate it first if only one item should change.
> Gotcha: equipment overlays must be authored against the same frame size and animation layout as the player sprite — the engine drives the overlay with the body's current frame, so a mismatched grid will look misaligned.
Body Type, Race & Character Variants
Armor and weapon sheets are cut against a specific body — a chestplate drawn for a male frame won't sit right on a female, kid or non-human frame. When your world has more than one playable body, give the item variants instead of forcing one sheet to fit everyone.
Below the Equipped Sprite Asset field, use Body Type, Race & Character Variants:
1. Click + Add variant. 2. Choose who the row is for — any mix of Body type, Race and Character. Leave a field on Any to not care about it. 3. Pick the sprite asset those wearers should see — the same visual gallery and embedded sprite editor as the default field, including None — hidden to hide the item on them only. 4. Save the item. Add a row for each body that needs its own cut.
| Field | What it does |
|---|---|
| Body type | A body type from your character creator packs (e.g. adult-masc, adult-fem, child) — the body the player picked when building their hero |
| Race | A race from Characters → Races |
| Character | A character template players choose at character creation |
| Sprite asset | The equipment sheet those wearers render; None — hidden hides the item on them |
How it resolves in-game, per wearer: every field a row sets must match the wearer, and the most specific matching row wins — a Character match beats a Race match, which beats a Body type match, and a row combining fields beats each of its parts. So adult-fem alone dresses every female hero, while Elf + adult-fem overrides it for elven women only. No match → the Equipped Sprite Asset → the item icon fallback.
> Gotchas: rows that name no body type, race or character — or have no sprite — are drafts and aren't saved; two rows with the same match keep the first. Body type and race come from the character creator, so they only match heroes built there. NPCs wearing gear use the default sprite. The character select screen dresses heroes with the same rules.
Worn as a Generator Piece
If your heroes are built from a character creator pack (for example the RPG Maker MZ generator) and your armor is cut from that same generator's parts, a plain overlay looks wrong: it covers the hair, and the outfit the player picked in the creator shows through underneath. Mark the equipment sprite as a generator piece instead.
1. Open the item's Visuals tab and edit its equipped sprite (or open it in Sprites). 2. In the sprite editor, set Worn as generator piece to the part the sheet was cut from. 3. For a Cloak, also pick the Behind-body sheet — the generator ships a cape as two sheets, one drawn in front of the body and one behind it. 4. Save. Add body-type variants (above) so each body wears the sheet cut for it.
| Part | Drawn at | Hides while worn |
|---|---|---|
| Outfit (Clothing) | Over the body, under beards and hair | The creator's outfit pieces |
| Cloak (front + behind) | Front sheet over the outfit, behind sheet under the body | The creator's cloak |
| Accessory A (circlet, mask) | Over rear hair, under front hair | The creator's Accessory A |
| Accessory B (hat, helmet) | Over the front hair | The creator's Accessory B |
| Glasses | Over the face | The creator's glasses |
> Gotchas: the sheet must use the same grid as your heroes' bodies (an MZ part is 3 × 4 frames of 48 px) — leave its animation list empty and it follows the body frame for frame. Accessory items only draw when they have an equipped sprite, so rings and necklaces never show their icon on the character. Heroes not built from a creator pack still draw the item over the whole character.
Cosmetics (Wardrobe)
A cosmetic changes how a slot looks without touching stats — the classic item-shop outfit. A player equips it like any gear, but it goes into their wardrobe instead: their real armour stays on and keeps giving its stats, and the cosmetic's look is drawn in its place.
1. Open Items, pick (or create) a head, chest, legs, boots, cape or accessory item. 2. On the Visuals tab, tick Cosmetic. 3. Give it an Equipped Sprite Asset (and body-type variants if it's body-cut) — that sprite is the whole point of the item. 4. Leave its stats empty; cosmetics never add any. 5. Save, then sell it in the Premium Shop or hand it out as a reward.
| Field | What it does |
|---|---|
| Cosmetic | Equipping wears it in the wardrobe: no stats, class or level requirements; its equipped sprite replaces the slot's look |
In game, worn cosmetics show in the inventory under Wardrobe. Clicking one takes it off and puts it back in the bag; the gear underneath shows again. The character select screen shows cosmetics too.
> Gotchas: weapons, tools, pets and mounts can't be cosmetics — their look drives stances and swings. A cosmetic with no equipped sprite hides nothing and draws its icon, so always give it a sprite. Taking one off needs a free bag slot.
Common Item Settings
Every item also supports:
- Max stack — how many can stack in one inventory slot
- Tradeable — whether players can sell or trade it
- Light emission — optional glow effect (color, radius, intensity)
- Sell price — gold value when sold to NPC shops
Item Affixes
Base items can roll prefix/suffix affixes — think "Superior Iron Sword of Health" — so the same base item drops with meaningful variation. Affixes are authored in the dedicated Affixes editor (in the app sidebar), separate from items, and applied per-item through the item editor's Affixes tab.
Affix definitions
Each affix is a reusable definition:
| Field | What it does |
|---|---|
| Position | Prefix (leading word, "Superior") or suffix (trailing phrase, "of Health") |
| Affix text | The name fragment added to the item's display name |
| Modifiers | One or more stat effects — target stat, flat or percent, and a min/max roll range |
| Applies to | Equip (modifies equipped CharacterStats) or consumable (boosts HP/hunger/thirst restore or status magnitude) |
| Tier & drop weight | How strong/rare the affix is when rolled |
| Allowed item types / min rarity | Which items can receive it, and the minimum rarity to qualify |
| Color | Tint used for the rolled name |
Per-item roll config
On each item you enable affixes and set the roll rules:
- Allowed affix IDs — the pool this item can draw from
- Max prefixes / max suffixes — how many of each can roll
- Roll chance — probability (0–1) that any affixes roll at all
- Roll timing — roll on drop (baked into the loot) or on pickup
Nothing is rolling affixes?
A new world ships with no affix definitions at all — until you author some in Items → Affixes, every drop is plain, no matter what an item's roll config says. An item's settings choose from a pool; they can't create one.
Once affixes exist, four things can still empty the pool for a given item. The server names the one it hit, once per reason, in its log:
| Log line | Fix |
|---|---|
No affix definitions exist in this world | Author affixes in Items → Affixes |
All N affix definitions are disabled | Enable at least one |
No affix definition applies to item type "X" | Add that type to an affix's Allowed Item Types (or clear the list), and give it a modifier for that kind of item |
Every affix that fits … needs rarity order N+ | Lower the affixes' Min Rarity, or raise the item's rarity |
An affixed item on the ground still shows its base name — the prefix/suffix appears once it's in a bag, because that's where the instance lives.
> Running locally? The local game server keeps its own copy of the database, cloned from the editor's the first time it starts. After that it only learns about new content through a live sync — which needs the server to be running when you press Save. Author affixes with the server stopped, then launch it, and it starts with the pool it had before. Either keep the server running while you author, or start it once with PGLITE_SERVER_FORCE_RECLONE=1 to re-clone the editor's database. Its boot log states what it actually loaded:
>
>
> [GameData] Loaded … 9 affixes @ 1 gear-drop chance
>
Loot Tables
A loot table is a named list of possible drops that mobs, chests and resource nodes point at, so "what a wolf drops" is authored once and reused everywhere.
Where to author them: Items → Loot Tables. The same editor appears inline on Mobs → (a mob) → Loot for drops unique to one creature.
Building a table
1. Open Items → Loot Tables and click New Loot Table. 2. Give it a Name and Description — the id is generated from the name. 3. Fill it with drops. Four ways, covered below: Add Items…, Blank Row, Paste list…, Copy from…. 4. Tune the rates — each row has a slider and a percent box, or select rows and use the bulk bar above the list. 5. Check the Roll preview at the bottom. It rolls the table exactly the way the server does, so what you see is what players get. 6. Save, then Publish so the live server picks the table up.
One drop out of many (pick groups)
Every row normally rolls its own chance, so a table can drop several items at once — or nothing. To make a set of rows drop exactly one of them, give them the same Pick group name:
1. Tick the rows (or type into each row's Pick group box).
2. Type a name such as gear into the bulk bar's Pick group and press Apply.
Rows sharing a group are one roll: the group drops with a chance equal to its rows' chances added up (capped at 100%), and then gives one of them, weighted by those chances. Two hundred rows of 0.5% each drop one random item every time; the same rows at 0.25% drop one half the time.
- Rows without a group keep rolling on their own, next to the group.
- A table can hold several groups —
gearandgemeach give their one item. - On a mob, a loot table's groups stay that table's own, so two assigned tables that both use
gearstill roll separately. - Loot find (the passive) gives its extra look to ungrouped rows only; a group has already chosen its item.
- Works on mob loot, loot tables and treasure chests alike.
Adding a lot of drops at once
A project with hundreds of items makes one-at-a-time picking painful, so the editor has three bulk routes:
| Button | What it does |
|---|---|
| + Add Items… | Opens a browsable item list with Category / Type / Rarity / Tier filters. Tick as many as you like, shift-click to take a run, or hit Select all N matching to take everything the current filter shows. Items already in the table are greyed out as added, so you cannot list the same drop twice by accident |
| Paste list… | Paste item ids or names, one per line. Add tab-separated columns for the rest: id ⇥ chance ⇥ min ⇥ max. Anything that matches no item is listed back to you rather than skipped |
| Copy from… | Borrows another loot table's rows — the fastest way to author a variant ("Wolf" → "Dire Wolf") |
| Copy rows | Writes the current table to your clipboard as tab-separated text you can paste into another table, another project, or a spreadsheet |
+ Blank Row is still there for adding a single drop by hand.
Tuning a lot of rows at once
Every row has a tick box. Tick some to target them — with nothing ticked, the bulk bar applies to the whole table.
| Control | What it does |
|---|---|
| Chance … % + Apply | Sets one drop chance across every target row |
| Qty … to … + Apply | Sets the quantity range across every target row |
| Pick group + Apply | Puts every target row in one pick group (empty = no group) — see below |
| Fill by rarity + Fill | Sets each row from the rarity curve you authored under Items → Rarities. The number is what your most common rarity drops at; everything rarer scales down by its Drop weight — with the default curve a 25% common lands rare at 4.2% and mythic at 0.08% |
| Duplicate | Copies each target row in place |
| Remove | Deletes the target rows |
Fields on a row
| Field | What it does |
|---|---|
| Item | Which item this row can drop |
| Chance | How often the row hits, as a percentage. Below 1% the editor reads it out as odds ("1 in 500") because a decimal stops being legible |
| Quantity | The min–max stack size handed over when the row hits. Rolled fresh each time |
| ↑ ↓ ✕ | Reorder or delete the row |
Gotchas
- Chances are not shares of a pie. Every row rolls independently, so they do not need to add up to 100% — a table of ten 50% rows drops about five items every kill.
- The same item on two rows rolls twice. The real drop rate is higher than either row reads. The editor warns you when it spots a duplicate.
- A 0% row can never drop, and a row whose max is below its min quietly drops the min only. Both are flagged above the list.
- Fill by rarity needs rarities to be worth filling. An item with no explicit rarity falls back to the one its tier implies, exactly as the game does — and if that tier points at a rarity you never authored, the row is treated as your most common one. If every rarity has the same Drop weight, every row gets the same chance, so tune the weights under Items → Rarity first. With no rarities at all the control is replaced by a note telling you where to author them.
- Row ticks are positional. Reordering, deleting or adding a row clears the selection, so a bulk edit can never land on rows you did not mean.
- Pasting never silently drops a line. Unmatched lines are listed under the box before you commit. Check that count — a typo'd name is the one way a table ships missing a drop nobody notices.
- Chance columns accept
5%,5or0.05— all the same 5%. Rows pasted with no chance column land at 25%. - Publish after saving. A saved table is not a live table until the world is published.
Equipment Loadouts
Players can save named equipment builds and swap to them in one action instead of hunting through the bag. A loadout records the definition for each slot (plus consumables), and equipping it resolves the best copy the player actually owns — ranked by equipment level, then equipment XP, then quality and affix strength, then newest. Swaps go through the normal equip pipeline (so restrictions, requirements and stat recalculation all still apply) and report per-slot results plus any consumables the player is short of. Equipping is locked during combat.
Buying the missing pieces
A build is only half-useful if the player doesn't own it yet, so the Loadouts panel can shop for them. Buy missing prices every piece the build calls for that isn't worn and isn't in the bag, shows a per-piece breakdown and a total, and buys them all on Buy all.
Where each price comes from, in order:
| Source | When it's used | What the player pays |
|---|---|---|
| NPC shop | The player has that shop open and it stocks the piece with enough units | The shop's live sell price, per unit |
| Player market | Otherwise | The cheapest active listing that covers the piece in one lot (never their own) |
| Nowhere | Nobody sells it | Nothing — the row reads "not for sale" and is skipped |
Consumable picks are quoted by shortfall: a build asking for 10 potions when the player has 4 quotes 6.
Nothing about this is authored — it works from the shops and market you already have. What you author changes what it finds:
1. Give vendors stock for the gear your builds use (NPCs → Shops → Stock). Only a shop the player is actually standing at and has open can be quoted from — a closed shop, or one they walked away from, drops back to the market. 2. Shop opening hours and stock sets apply as normal; a piece a shop only sells in winter quotes from the market in summer. 3. Everything else comes from live player listings, so a healthy market is what makes rarer builds buyable.
Things worth knowing:
- Quotes reserve nothing. Prices are re-checked the moment the player confirms, so nobody can quote-and-hold to lock a listing away from other buyers.
- Prices that move are refused, not absorbed. If the true total comes back more than 5% over what the player was shown, nothing is bought and they get a fresh quote to confirm again. Their silver never leaves without goods.
- Partial success is normal. Each piece is bought on its own through the ordinary shop/market purchase — a listing sniped mid-purchase fails that piece and the rest still complete. The result lists what was bought and what wasn't.
- Buying is not the same as equipping: the pieces land in the bag, then Equip puts the build on.
- Turning the Equipment Loadouts flag off hides the whole panel and rejects both the quote and the purchase.
Loadout Kits
A loadout kit is a named gear bundle you author once and any NPC vendor can sell as a single purchase — "Recruit's Kit", "Miner's Starter", "Arena Loaner". The buyer pays one price, receives every piece at once, and can put the whole build on with a second click. It is the fastest way to get a new player dressed, and the cleanest way to hand out a fixed set for arena or tutorial play.
Where to author them: Items → Loadout Kits. Where to sell them: NPCs → Shops → (a shop) → Stock.
Building a kit
1. Open Items → Loadout Kits and click New Kit. 2. Give it a Kit name — this is what the shop card says, so write it for players ("Recruit's Kit", not "kit_01"). The id is generated from the name. 3. Add a Description and Bundle art. Both appear on the shop's kit card. 4. Under Gear, click Add slot, choose the equipment slot, then choose the piece. The item picker only offers items that actually equip into that slot, so you cannot file a helmet under boots. 5. Optionally add Consumables — potions, food, ammo. Each row is an item plus how many of it the buyer receives. 6. Optionally fill the Hotbar preset. When the buyer equips the kit, these abilities are placed on their hotbar. 7. Click Validate to dry-run the kit (below), then Create Kit. 8. Go to NPCs → Shops, open the vendor that should sell it, switch to the Stock tab, set Sells to Loadout kit, pick your kit, and add it. 9. Publish, so the live game server receives both the kit and the stock row.
Fields
| Field | What it does |
|---|---|
| Kit name | Player-facing bundle name — the heading on the shop card |
| Description | The blurb under the name on the shop card |
| Bundle art | Image shown on the card, picked with the media picker like any other icon |
| Gear → Slot | Which equipment slot this row fills. Each slot may appear once |
| Gear → Piece | The item that fills it. The list is filtered to items whose own equip slot matches |
| Consumables → Item / Quantity | An extra stack handed over with the gear. Up to 12 stacks. Add many… fills several at once and stops at the cap, telling you what didn't fit |
| Hotbar preset | Abilities placed on the buyer's hotbar when they equip the kit. Optional |
On the shop's stock row the ordinary stock fields all still apply to a kit:
| Field | What it does for a kit |
|---|---|
| Price → Auto | The bundle costs exactly what its pieces would cost bought one by one from this vendor — same buy mode, same markup, same daily price wobble |
| Price → Fixed | Pins the bundle price. This is how you give a bundle discount |
| Stock | How many kits this vendor has. -1 = unlimited |
| Restock / cycle | How many kits come back each refresh cycle |
| Set | Puts the kit in a rotating / seasonal / date-window stock set, exactly like an item |
Validate before you ship
Validate checks the kit against your live data and writes nothing. It reports:
| Problem | Why it's blocked |
|---|---|
| Kit has no gear | A bundle with nothing in it can't be sold |
| Item no longer exists | A piece was deleted after the kit was built |
| Item equips into another slot | The piece is filed under a slot it can't fill |
| Item can't be equipped | The piece has no equipment slot at all |
| Two pieces in one slot | Only one item can occupy a slot |
| Two-handed weapon beside an off-hand | The set could only ever be half-equipped, so it is rejected at authoring time instead of in front of a player |
| Missing hotbar ability | A warning, not an error — the gear still lands, only the preset comes up short |
Saving runs the same check, so a kit that can never be worn never reaches a shop.
Things worth knowing
- Buying is all-or-nothing. The server proves the buyer has room for every piece before charging them, so a full bag refuses the purchase instead of voiding half a kit.
- A broken bundle refuses to sell. If any piece has been deleted since you published, the vendor turns the purchase down rather than handing over less than the card advertises.
- Deleting a kit removes it from every shop that sold it — no vendor is left with an unbuyable shelf entry.
- Auto pricing is a sum, never a discount. If the bundle should be cheaper than its parts, set Fixed.
- Buying is not equipping. The pieces land in the bag; equipping the kit runs the ordinary loadout equip path, which re-validates every piece and is still locked during combat.
- Publish is required. A kit authored while your game server was offline reaches it on the next Publish, along with the shop that sells it.
- Turning the Equipment Loadouts flag off stops kits being sold.
Item Timeline
Item instances carry a history, not just stats. The timeline records:
| Event | When |
|---|---|
| Creation | The item came into existence |
| Level up | It gained an equipment level |
| Boss defeat | It was equipped for a boss kill |
| Enchant added / removed | A rune was socketed or pulled |
| Upgrade success / fail | A +N attempt resolved |
| Rename | It was renamed |
| Ownership transfer | It changed hands |
This is what makes a specific sword that sword — a piece with a history reads differently on the market than a freshly crafted one.
Rarity & Quality
Rarity and quality are two independent, fully authorable axes, edited from tabs on the Items page:
| Axis | What it means | What you author |
|---|---|---|
| Rarity | How special the drop is (common → legendary → your own tiers) | Name, color, whether dropped items raise a light beam, and an optional custom Beam VFX to replace the built-in light pillar |
| Quality | How well-made a specific copy is | Stat multiplier, craft-roll threshold, roll weight, and color — for as many tiers as you want |
A quality's stat multiplier actually scales the item's stats when equipped, so a Masterpiece sword really is stronger than a Normal one. Both lists are ordinary authored data — add, rename, recolor, or delete tiers freely; the crafting roll, inventory sorting, and item tooltips all read your rows.
How Loot Looks on the Ground
Drops are readable from across the screen without opening anything:
- Floor items are tinted by rarity, and rare-and-above tiers raise a rarity-colored light beam
- Light-emitting items (torches, glowing gear) cast their light where they land
- Killed mobs scatter their drops in a spiral around the corpse instead of stacking on one tile
- Mob silver drops as a physical coin pile the killer can pick up (with their premium multiplier applied), not a silent wallet credit
- Inventory slots draw a rarity ring and glow so the tier reads at a glance